
The great hope for AI agents is that they will automate many of the repetitive tasks office workers perform, such as writing and emailing weekly project updates. These tools combine rules-based automation with generative AI models to perform a series of tasks that make up a workflow.
In this vein, Google late last year announced Workspace Studio, a no-code application that lets non-programmers choose from prebuilt steps or use natural language descriptions to create and customize agents that automate workflows in Google Workspace. These “flows” integrate with Workspace apps including Gmail, Docs, Sheets, Drive, Calendar, Chat, Forms, and Tasks, and also (in limited preview) some third-party apps such as Asana, Mailchimp, and Salesforce. Google’s genAI assistant, Gemini, helps you create and execute flows.
Who can use Workspace Studio: Announced in December 2025, Workspace Studio is now rolling out to Google Workspace business, enterprise, and education customers. (Your administrator may need to enable access to Gemini.) It’s also available to users with Google AI Pro for Education and Google AI Ultra for Business accounts.
This quick guide will show you how to navigate Google Workspace Studio, how to set up a flow, and how to manage your flows.
In this article:
- What is a flow?
- The Workspace Studio home page
- Build your first flow
- Create a flow from a template
- Prompt Gemini to build a flow
- Manage your flows
- Tips for building flows
What is a flow?
In Google’s parlance, a flow is a series of steps that automatically run in the background of your Google Workspace environment. The flow waits for a “starter” event to happen, and when it does, one or more actions is triggered in response. Some examples:
- When you receive an email with an attachment, the flow examines the attachment to see if it has certain financial data in it. If so, then it extracts this information and sets it into a specific Google Sheets spreadsheet in your Google Drive.
- Two hours before your weekly department meeting, the flow reviews the current statuses of projects listed in a specified Sheets spreadsheet or Tasks task list, writes a summary of them, and then emails this summary to the meeting invitees.
In the background, Gemini is used to “reason” through the execution of a flow, analyzing your documents or other content that the flow references, to help ensure that the actions taken by the flow go through successfully.
A flow can also be set on a schedule or in response to an event to enter a prompt into Gemini, or to execute a Gem. (Gems are customized AI agents trained on specific topics. See our guide to Gemini Gems for details about using them.) For example, you could create a flow that runs every Friday and prompts Gemini to write and send an email summarizing the latest data in a Google Sheet that you and your co-workers update frequently.
There are three ways you can create a flow in Workspace Studio:
- Using a template (a premade flow that you customize)
- Prompting Gemini to design one for you
- Using the builder tool within Workspace Studio
But first, we’ll cover how to get around in Workspace Studio.
The Workspace Studio home page
When you open the Workspace Studio home page (also known as the Discover page), you’re greeted with a text entry box for Gemini. You can type a prompt inside it describing the actions (a.k.a. “steps”) that you want a flow to take when something happens (a “starter” event or schedule).
Three suggested flow templates appear below the Gemini text entry box. (In the screenshot below, the templates are Label emails with action items, Streamline my follow-up, and Catch up on news.) You can click a template to activate it.
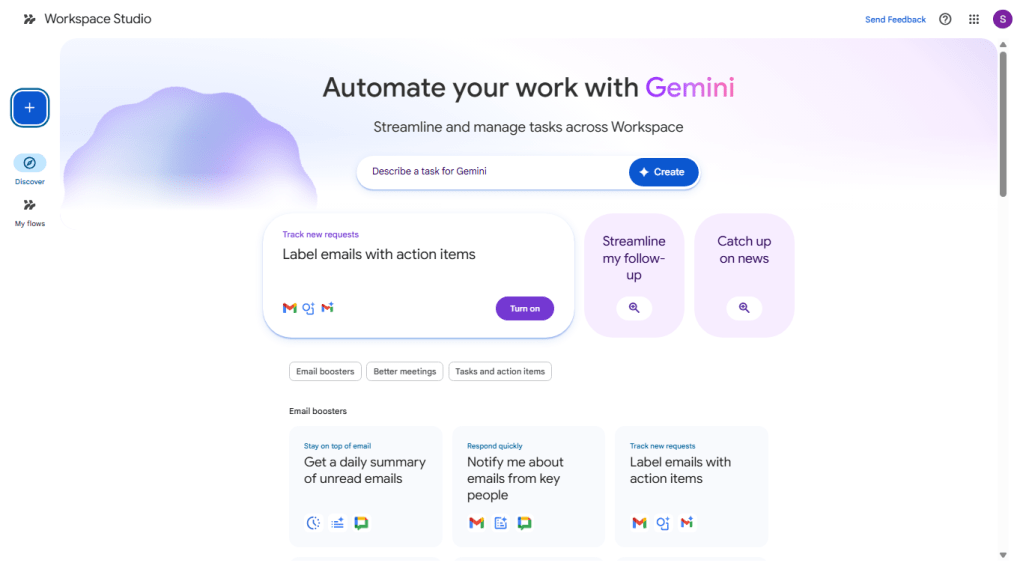
On the Workspace Studio home page, you can type in a prompt for Gemini to create a flow, select a flow template, or click the big + sign to start a new flow.
Howard Wen / Foundry
Below these three suggested flows, there are even more flow templates. They’re organized under categories describing what they’re for, such as “Email boosters,” “Better meetings,” and “Tasks and action items.”
The vertical toolbar along the left has three icons:
+ symbol (for “New flow”): This opens the tool for building a flow.
Discover: This is the default home page with the Gemini text entry box and templates below it. If you’re in another page of the Workspace Studio, such as the “New flow” page above, clicking this takes you back home.
My flows: This opens a page that lists the flows you’ve created. You can manage your flows: delete, edit, rename, or share them with others. This page also has a tab you can click to view an activity log that lists which flows are active, when they were executed, what steps they took, and if their execution was successful or not.
Build your first flow
On the home page, you can use Gemini or a template to start a new flow. But it helps to learn by using the flow builder tool first. This way, you’ll understand more clearly how flows work. (Even if you use Gemini or a template, you’ll be taken to the flow builder interface, because you must review and test the flow before you can activate it.)
On the left toolbar, click the + symbol. The flow builder tool will open in the main window to the right.
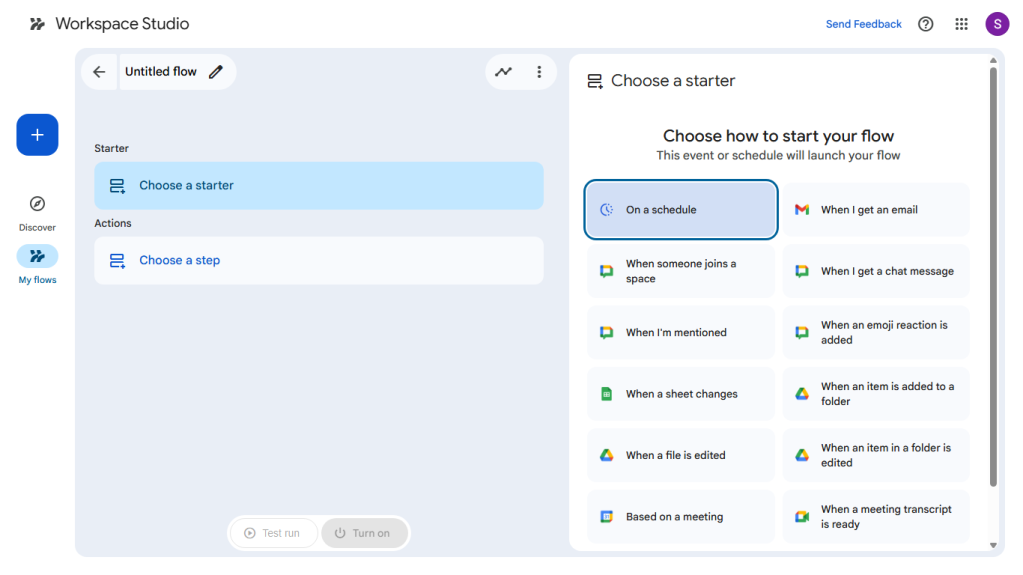
Workspace Studio’s tool builder, with the flow in the main window and suggested “starters” to the right.
Howard Wen / Foundry
First, give your new flow a name. Toward the upper left, click Untitled flow and type in a name for your flow.
Selecting an event (a.k.a. “starter”)
Below the flow name, click Choose a starter. Then, in the pane along the right, select an event that will trigger the flow to take action. Once you’ve selected a starter event, the pane on the right may show additional parameters to fill in. Examples:
- On a schedule: The action will happen on a day, date, and/or time that you set. This can be recurring, such as every Wednesday at 9:00 a.m.
- When I get an email: The action will happen when an email arrives in your Gmail inbox. You can select certain attributes for the email, such as who it’s from, what words it contains, or if it has attachment.
- When a sheet changes: Whenever a change is made to a spreadsheet in your Google Drive, the flow triggers an action such as sending you an email or a Chat notification. This flow is handy if you’ve shared a spreadsheet with co-workers to collaborate on.
- Based on a meeting: The flow can take an action before a meeting you’ve scheduled in Google Calendar, or it can perform an action after the meeting has happened.
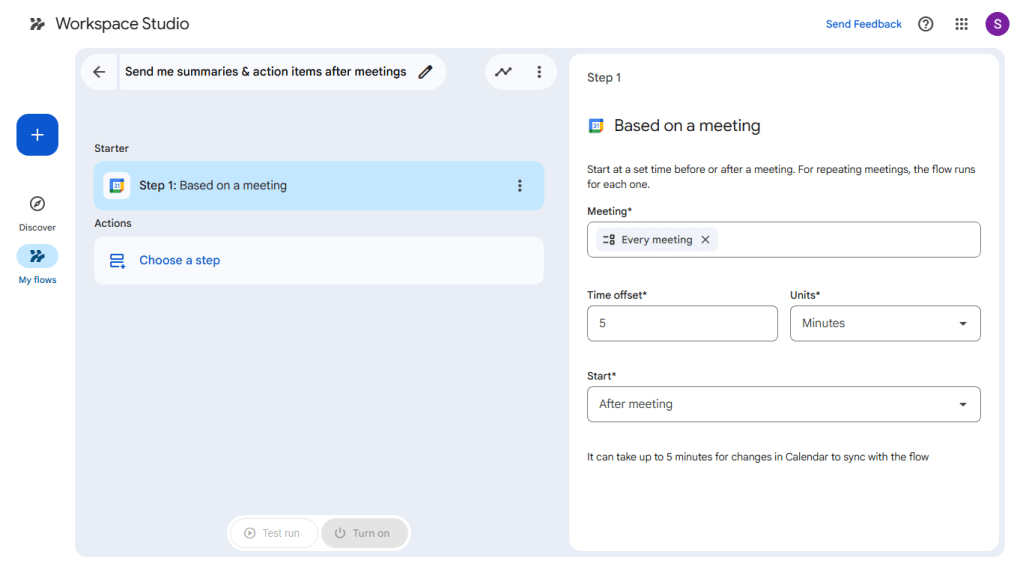
This flow is set to start 5 minutes after every meeting ends.
Howard Wen / Foundry
A flow can have only one starter, which becomes Step 1.
Selecting one or more actions (a.k.a. “steps”)
Once you’ve selected a starter event for the flow, click Choose a step in the main window.
In the right pane, there are several actions (steps) that you can select from. They’re presented under categories such as “AI skills,” “Tools,” and individual Workspace apps (Gmail, Chat, Sheets, etc.) and can include anything from adding a label to a Gmail message to sending Gemini a prompt. There are also steps that can integrate with your accounts on Asana, QuickBooks, and Salesforce.
For example: If a document is added to a specified folder in your Google Drive (the starter), the flow can trigger Gemini to generate a summary of the document’s content (the step).
You can add more actions that your flow will execute when the starter event happens. In the main pane, and below the first step of your flow, click + Add step, then select a second step from the right pane that the flow will take after it executes the first step. The maximum number of steps that you can add to a flow is 20.
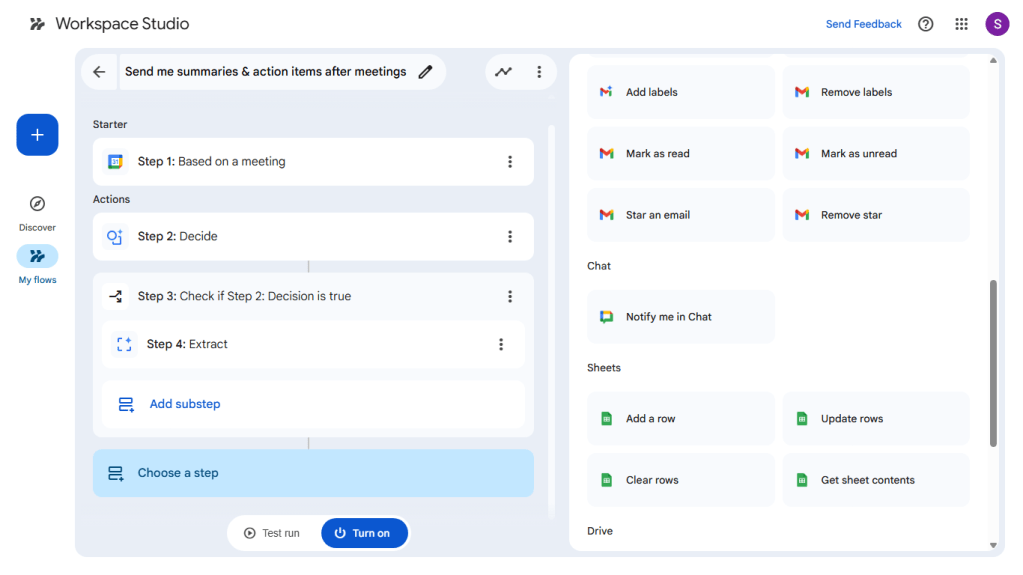
A flow with a starter event, steps, and a substep to execute.
Howard Wen / Foundry
You can add a substep to a step (click Add substep in the main pane); indeed, certain steps require you to do so. A regular step is a main, sequential action in the overall flow, executed one after another. A substep is subordinate; it is only executed after and as a result of its parent step. For example, a step could identify a document, with its substep sending the document to a specific folder. (In the screenshot above, Step 4 is a substep of Step 3.)
You may also opt (or be required) to add a variable for a step (by clicking the + Variables button in the right pane). For example, a variable could be a time or date that you want the action to be executed, or text that you select, such as the title for a document that you want an action to generate.

Adding a document title variable to a step.
Howard Wen / Foundry
There are currently about a dozen starters and two dozen steps to choose from in Workspace Studio. See Google’s comprehensive list of Workspace Studio starters and steps for descriptions, examples, and configuration details for each one.
Testing and activating your new flow
When you’re finished building your flow, click the Test run button at the bottom of the main pane.
The right pane guides you through what will happen: When you click the Start button in this pane, your flow will be executed. Note that the test run takes real actions, such as changing a document or setting up a meeting. Google recommends temporarily setting up the flow with a test document or a meeting where you’re the only invitee. If the test run works, you can go back and swap in the real document or meeting before deploying the flow.
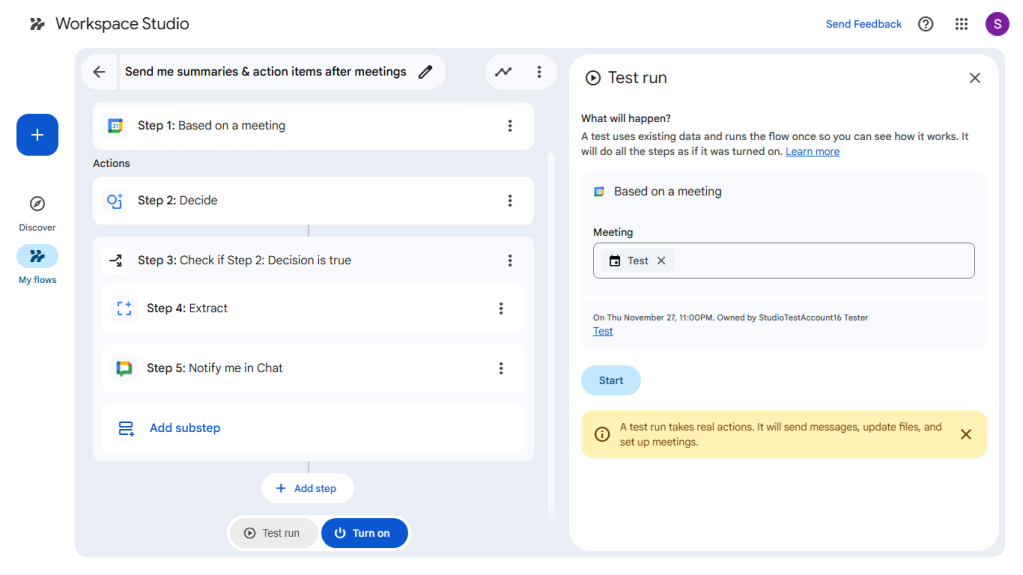
Click Start in the right pane to test the flow.
Howard Wen / Foundry
If the test run is successful (or not), you’ll see a notice at the bottom of the right pane. If the test isn’t successful, you’ll be advised on what fixes you can make to the steps in your flow.
After you’ve confirmed that your new flow will work according to the test run and made any final adjustments, click the Turn on button at the bottom of the main pane.
Note: You can create a maximum of 100 flows, and other limits apply, such as how many times your flows can run each day.
Create a flow from a template
Now that you know how flows work, check out the Workspace Studio templates to see if any fit your workflows. Click Discover in the left toolbar to return to the Workspace Studio home page, scroll down to see all the available templates, then click on a template. The flow builder tool opens with all the steps already in place.

A flow template in the flow builder tool. You set parameters such as start date and scheduling, and you can customize it further if you wish.
Howard Wen / Foundry
Click on each step (including the Starter step), configuring each one for your needs, such as selecting a specific file to take action on. You can also add, delete, or reorder steps in the flow using the three-dot (“More”) icon next to a step.
Prompt Gemini to build a flow
The fastest way to build a flow is to have Gemini do it. On the Workspace Studio home page, type a description of the flow you want into the text box and click the Create button.
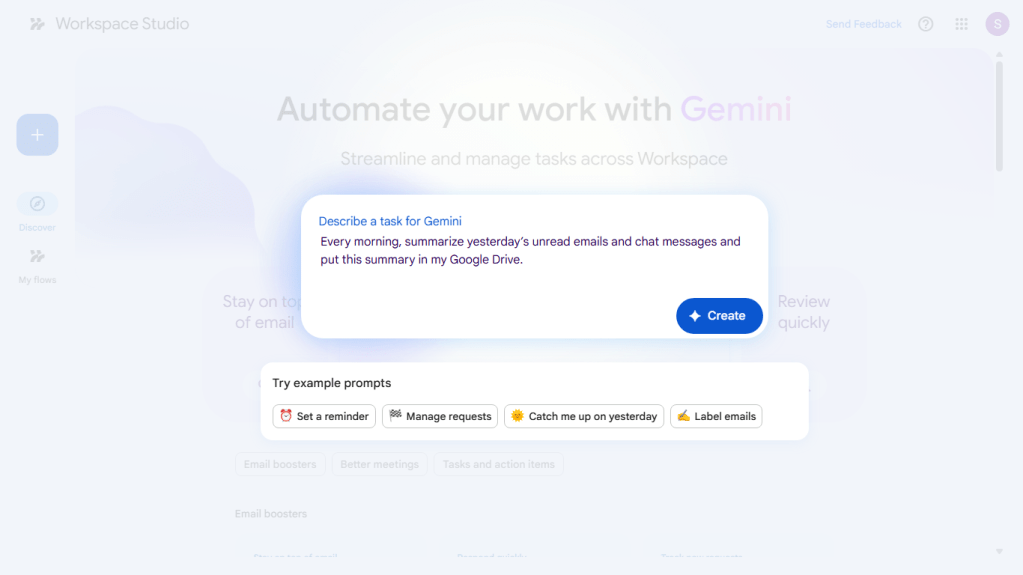
Describe the flow you want Gemini to create.
Howard Wen / Foundry
Generally, you want to describe three things in your prompt:
- What is the action that you want the flow to do?
- When should this action happen, or what event should happen that triggers this action?
- Where do you want the flow to put the results of this action?
Example prompts:
- Every morning, summarize yesterday’s unread emails and chat messages and put this summary in my Google Drive.
- When I get an email with the word “budget,” label it appropriately.
The possibilities for prompting Gemini to build a flow are very broad. So it helps if you’re familiar with the Google Workspace apps that flows can interact with and have the imagination and savvy for experimenting with writing AI prompts.
Once you’ve clicked Create, the generated flow opens in the flow builder tool, where you can review and edit it if needed.
Manage your flows
On the toolbar along the left, click the My flows icon. A list of your flows will open to the right in the main window.
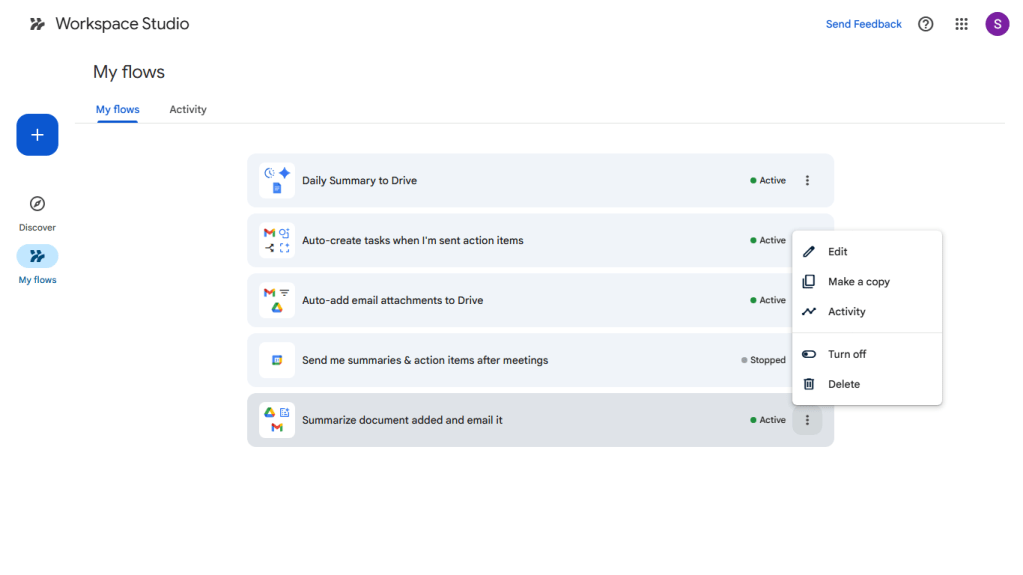
You can manage your flows on the “My flows” page.
Howard Wen / Foundry
Click the three-dot icon to the right of a flow’s name. This will open a menu with selections for you to manage the flow: Edit, Make a copy, Activity, Turn off, Delete.
- Edit will open the builder tool page for the flow. Its starter and steps will be listed in the main pane, and the descriptions for each appear in the right pane. You can make changes to each or delete them.
- Make a copy is handy if you want to create a new flow that’s a variation of the original one. You can make a copy, give it a different name, and customize it.
- Activity opens a page in the main window that shows when the flow was most recently executed and whether it was successful.
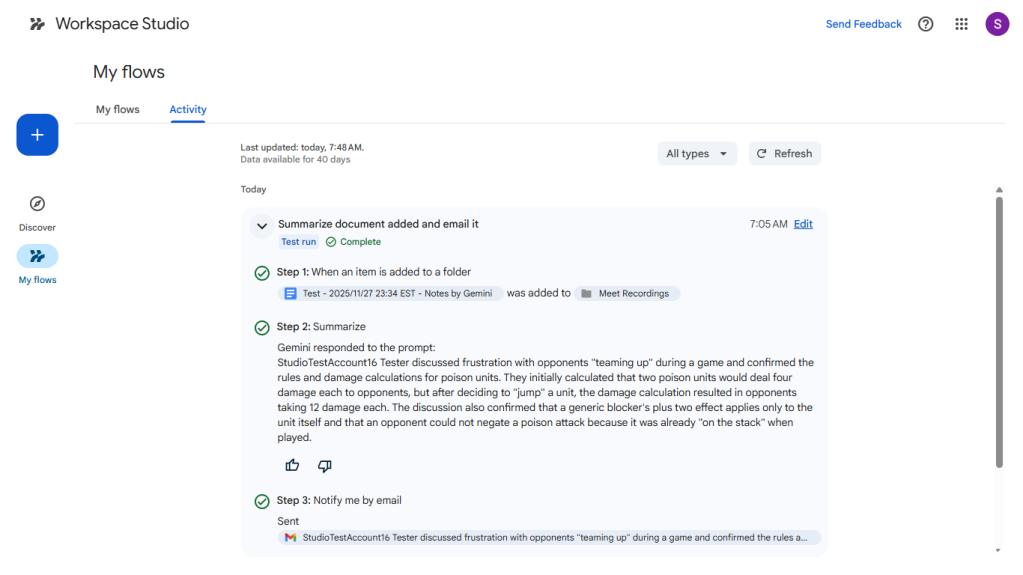
Reviewing the activity for a flow.
Howard Wen / Foundry
Clicking the Activity tab on the “My flows” page takes you to a page that lists the activities for all your flows.
To share a flow with others in your organization, select it in the list of flows, then click Get a link to copy at the top of the page. Change the permission to Anyone in your organization with the link can make a copy, then click Copy link. You can share the link with co-workers via email or in Chat.
Using the Studio sidebar in Workspace apps
In Gmail and Google Chat, you can open a sidebar that helps you manage your flows. Look to the upper-right corner of the Workspace app for the Studio icon — it’s between the Settings gear icon and Ask Gemini nova star. Click this and the Studio sidebar will open along the right. It has three tabs in it:
Discover: Like the Workspace Studio home page, this tab presents suggested flows that are ready for you to activate.
When you add a new flow by selecting a template in the Discover tab, you’ll be taken to the flow builder tool in the Workspace Studio app. You have to customize and test run it from here before you can activate it.
My flows: This lists your flows. You can delete, edit, rename, or share them from this tab.
Activity: This tab shows the activity log of your flows — when they went into action and the steps that they took.

The Studio sidebar lets you manage flows from within Gmail and Google Chat.
Howard Wen / Foundry
Tips for building flows
Learn by example: Select a flow template and customize it in the tool builder. This will help you learn how a flow works.
Reference files: Use the @ to directly reference a file in your Google Drive when you’re customizing a step in the flow builder tool or writing a Gemini prompt to generate a flow.
Experiment: Don’t be afraid to experiment with your prompts to Gemini. Describe the flow you want, using everyday language. Remember, your prompt should answer what, when, and where.
Review flow activity: After a flow is executed, review its activity log to understand how it played out its steps.
Related reading:
- 6 ways Gemini supercharges Google Sheets
- 5 ways Gemini can help you make Google Slides presentations
- How to use Gemini AI to write (and rewrite) in Google Docs and Gmail
- A beginner’s guide to Google Gemini Gems
- Google Workspace: 7 great ways to use the Gemini AI sidebar
- Google Workspace power tips: Tap into cross-app productivity
- More Google Workspace tips and tutorials